Sunday, July 31, 2011

Framing your Panel

One of the challenges of solar panel making here in the Philippines is where to get the right materials. Sometimes we have to use what is available locally in order to make your own solar panel.

Glass Alternative

The glass I used in this panel frame is just a regular glass, though it's not the recommended glass, it's the readily available and affordable alternative I could easily find.
Recommended glass for this application is TEMPERED GLASS, and the next best is ACRYLIC GLASS (popular known brand name is PLEXIGLASS). Both are locally available in the Philippines. Try inquiring to you nearest glass and aluminum supplier for this type of glass. Tempered glass are more expensive than regular glass, and it won't be readily available, you have to wait for atleast 2 weeks to process your order since tempered glass cannot be cut into sizes.

Materials and tools:

- Glass - 3/16" thick
- 1x1 Aluminum Angle Bars
- Rivets

- Rivet Gun
- Caulk Gun
- Silicon Sealant


Below are the photos of the very first panel frame I made myself. 


The silicon sealant is used. This is just a regular sealant I purchased at Glass/Aluminum Supplier


Notice how I applied the sealant around the frame. This helps in waterproofing the solar panel.


Detailed photo of the the corners. Rivets was used to attached each angle bars.

The finish product..

Friday, July 15, 2011

Do It Yourself Solar Panel

Solar Panel ConfigurationYou don't need to be an Engineer to make your own solar panels. But if you are new in making one, it is always good to start small to gain experience.

Usual configuration for 3x6 cells (0.5v) is 36 cells connected in series. This will give you around 18 volts or more, enough to charge a 12 volt battery.

And from it, you can expand with another 36 cells panel and so on.. Just make sure to consult a professional before venturing in to a lot high voltage panels. ** S a f e t y f i r s t ! **


Putting it all together..

Now that you have a full tabbed cell (pls. see Solar Cell Basic page) you can start putting it all together. I believe that visual instruction is easier to follow, then again, the pictures below show you how to solder it all together.


Picture
Apply flux on each contact point before soldering.

Picture

Picture
What I always do is line up three (3) tabbed cells (positive side up) and then solder them together..

Picture
The negative side (blue side)..

Picture
The positive side. This is how it will look like after soldering 3 cells together..

Picture
Above shows 1.56Volts for 3 (0.5volt) cells, meaning all cells are working and I did a good job soldering it.
It's always a good idea to check your soldering while it's still small, it is easier to detect a bad cell if you have one.


Below are the pictures of how I did the Bus wire..

Picture

Picture
Picture
Picture

Picture

This is how it will look like after soldering everything. Finish product on a 1/4 inch thick plyboard.

Solar Cell Basics

Solar Cell A solar cell (also called photovoltaic cell or photoelectric cell) is a solid state electrical device that converts the energy of light directly into electricity by the photovoltaic effect.

Solar Panel
A solar panel (photovoltaic module or photovoltaic panel) is a packaged interconnected assembly of solar cells, also known as photovoltaic cells. The solar panel can be used as a component of a larger photovoltaic system to generate and supply electricity in commercial and residential applications.


Negative and Positive..

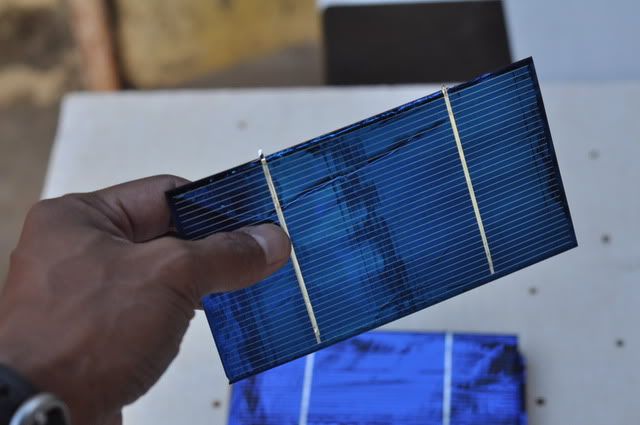
The front side (blue side / sunny side) is the negative side of a cell. The two thick white lines are the bus bars they are the negative terminals of the cell. The back side with 6 square dots is the positive side.


Tabbing Wire, Bus Wire, Flux pen and Soldering Iron

These are the basic materials that you need in making you own Solar Panel.. and of course the solar cells.
Tabbing wire
Tabbing wire.. this is what you will use in connecting all your solar cells to make a panel.
Picture
Bus wire.. thicker than the tabbing wire, use to connect your solar cells array together to complete your solar panel.
Picture
Flux Pen.. is designed for easier soldering of tab wire to electroplax or many other soldering purposes.
Picture
Soldering Iron..


Tabbing/Soldering of Solar Cells...

At first, tabbing or soldering cell maybe the hardest and frustrating part in solar panel making. But with a little practice and the help of Flux pen and a
decent Soldering Iron it'll be a lot easier.
The pictures below will show you how to solder a tabbing wire. In this example I used a short tabbed 3x6 polycrystalline cell.


Cut 3 inches of tabbing wire..
1.) Cut around 3 inches of tabbing wire.


Since in this example is a 3x6
short tabbed cell,
you will cut around 3 inches of tabbing wire.


If in case you are going to use 3x6 untabbed cells, you will be needing twice the length of tabbing
wire.


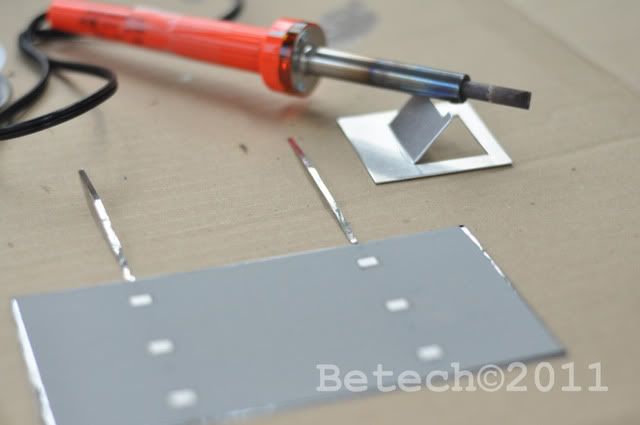
2.) Apply flux to short tabbing wire..

Photos below show that I'm applying flux on the positive side but you can also do it on the other side. Your choice..


3.) Solder the 3-inch tabbing wire..
Picture

This is how it will look like after you're done soldering. =====>>


There are times that the tabs are too short and it's hard to solder it on the other side..


Now you have yourself a full tabbed cell..


4.) Repeat the process..

The number depends on how much voltage of panel you are going to make.

Solar Power Systems Overview

Solar Power Systems

We use solar power system to produce electricity coming from the sun, wherein we can use it in our everyday lives. The advantage of this system is that your source of energy is free, clean and renewable. But ironically you have to make initial investment on the said system. Below are the basic requirements that you'll be investing on if you are planning on having your own solar power system.

Basic Setup.. A Solar panel and a battery

The basic and most simpliest form of solar energy system consist of just a solar panel connected to a battery. If you put the panel under the sun it will produce a voltage higher(should be 1.5X higher) than the battery, this will cause the battery to be charged.

Illustration courtesy of :http://www.solar-facts.com/


Then came the Charge Controller..

The setup above is not really a good idea since sunlight is unpredictable (most of the times). This can either drain or overcharge the battery, both can cause damage to the battery. This is what Charge controller is for. It is connected between the panel and the battery where it monitors and control the current flow.


Illustration courtesy of :http://www.solar-facts.com/


And there's more.. The Inverter

Most of our appliances uses 110 or 220 volts. Of course you can't use a 12volt battery with this. Inverter is a device that converts your 12volts DC into a 110 or 220 volts AC.


To sum it all up, here are your basic requirements for your solar power needs:

1. Solar Panel

2. Battery

3. Charge controller

4. Inverter

This will be explain further in my future post.. :O)